When it comes to maintaining a Windows computer, defragmenting the hard drive is one of the most important maintenance tasks. In a nutshell, defragging the hard drive reshuffles and sorts the files in a more practical order for Windows to work with. If you have a messy desk with papers scattered all over the place, finding a particular sheet or document is more time consuming, compared to having everything sorted in an In and Out box.
Traditionally, most average computer users relied on third-party software to schedule and defrag their hard drives. Some more advanced users would use the Task Scheduler and command-line inputs to schedule hard drive defragmentation. Granted, the easiest way to help keep a healthy hard drive was to purchase something like Diskeeper.
Do not get me wrong, Diskeeper is well worth the money, and will help reduce hard drive fragments more efficiently than the built-in Windows utility. The newer versions also defragment your hard drive while your computer is running. You do not have to schedule a specific date and time.
Though it may sound like I am gunning for everyone to run out and buy Diskeeper, I do realize that in today’s economy, most folks want to shave costs where they can. Before you shell out hard cash for that product, take a look at some freeware I recently came across that mimics Diskeeper, to a degree.
The people at IOBit.com were kind enough to release their SmartDefrag product to the world for free. I am guessing that right about now you are asking why choose this over other freeware products or the built-in Windows defrag tool. Well, I will tell you what I know; then you can download and decide if you think it fits your needs. Since it is free, you are not out any money for trying it.
Installation is pretty standard fare. License text, Next, etc etc, Next… If you want to install the Yahoo Toolbar alongside the setup feel free to do so; I skipped that part. Let’s scoot on to the main menu. I will direct your attention first to the left hand side of the main interface.
Here is the quick menu for moving around in SmartDefrag. This provides a nicely arranged listing of the available areas of the program. If we were to go ahead and click on Defrag Now (though it is the default selection), we get the following screen on the right hand side of the SmartDefrag window.
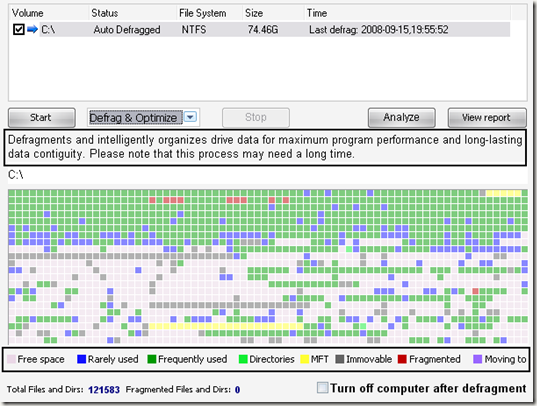
This is a portion for the initial screen. I wanted to point out two things before going further. First, this is the section used to running an immediate hard drive defrag, should you choose to do so. It gives you the option to Defrag Only (not too time consuming), or to Defrag and Optimize (take more time to accomplish). You can also click on Analyze to show an overview of your hard drive’s current level of fragmentation (see below).
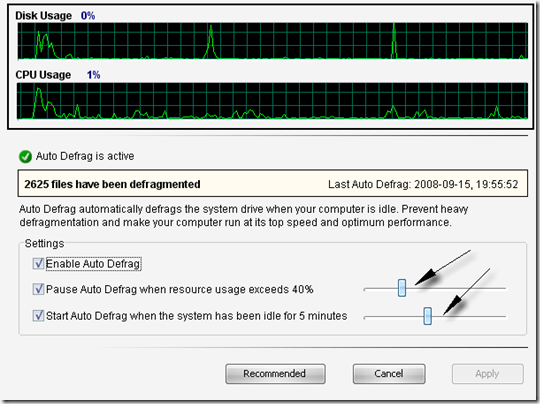
Using the color-based legend, one can get a general idea of their hard drive’s health. Of course the more red you see, well, exactly. Green is good, red is bad. Pressing forward, you may or may not of noticed one small detail. The Auto-Defrag feature has been running since SmartDefrag was installed. Nothing had to be pushed, flipped, or clicked on. However, in the Defrag Now screen, it made a note next to the C:\ drive to this effect. Let’s go on to the Auto Defrag menu to see what it is doing.
Other than showing Disk Usage and CPU Usage, there are only a few options in this menu screen. Of course the most important item is showing a green icon to indicate that Auto Defrag is running. The options here include the ability to turn Auto Defrag on or off, when to not run Auto Defrag, based on resource load, and when to let the service run should your computer be idle for some period of time. Keep in mind that these are just default values, and you use the slider bars to adjust these values higher or lower to your tastes.
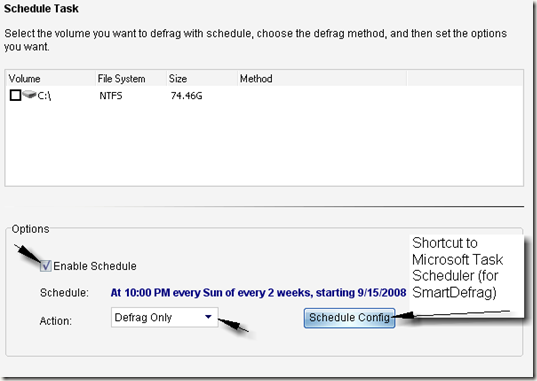
Now if you are the type that prefers to keep the lowest load possible on their computer, you may not want Auto Defrag to run (even though it uses very little RAM and CPU). If this sounds like you, you can simply turn the automation off and use the Schedule menu instead.
Here you can choose individual hard drives, should you have more than one. The bottom portion of the menu is where you setup the actual schedule portion. You can choose Defrag Only or Defrag and Optimize. Here is the part that confused me a little bit. Instead of adding their own interface for the Schedule Config button, they made it a front-end for the Windows Task Scheduler.
Granted, the Task Scheduler is not difficult to work with, this is just something that I thought was quirky. In all honesty, a great deal of programs use the Windows Task Scheduler, even though they may have their own specialized shiny menus. SmartDefrag just skips the extra shiny part.
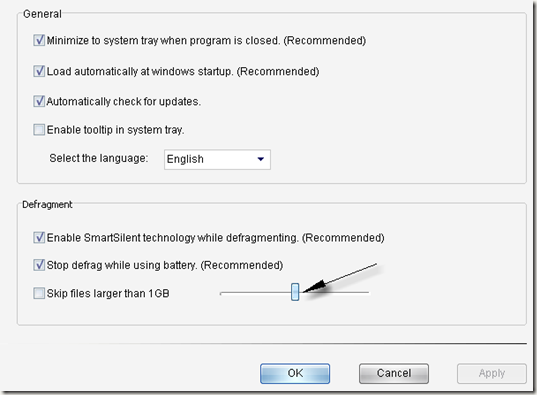
The last menu item is the Options section. Again, we are not inundated with a shopping list of things to choose from. Just a few simple choices comprise the Options menu. Most of them are already turned on, and the default setup is practical with little need to alter the settings, in my opinion.
I would point out that one of the more important items to remember is the "Stop defrag while using battery" option. If you are using this on a laptop, make sure this box is checked. Though SmartDefrag is light on using RAM and CPU time, anything running steadily against a laptop hard drive decreases battery run time.
How does SmartDefrag stack up against Diskeeper? I am not certain, yet. The IOBit website boasts similarity to Diskeeper, without the monetary expenditure. If, performance wise, it comes in fairly close; I would say it is worth saving approximately $50 and not buying Diskeeper. However, the final word will have to come from the individual user, as to determining if SmartDefrag is a good fit for them.


Post a Comment